Your vehicle's coils are the spring-like components that sit between your car’s axle and the body of the car itself. Playing a vital role in helping to absorb all the bumps and dips in the road, coil springs keep you both safe and comfortable behind the wheel.
Although it’s not a particularly common job, there a number of benefits to changing your vehicle’s coil springs. Not only will upgrading your springs improve the overall ride quality of your car, it’ll also enhance its looks too - often catering for that cool ‘lowered’ effect that petrolheads often favour.
Interested in seeing which coil springs are designed to fit your motor? Simply enter your registration number on this page and we’ll show you a list of affordable options right here at CarParts4Less.
Just be warned though, changing your vehicle’s coil springs isn’t the easiest job in the world, so if you’re new to the world of engineering or car mechanics, you may want to consider getting a trained professional to assist you.
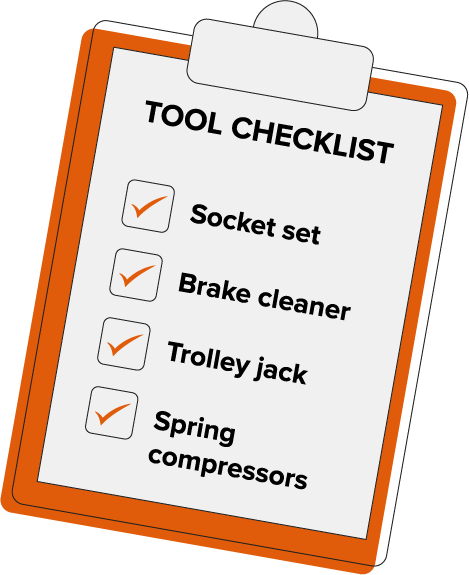
When it comes to changing your vehicle’s coil springs, there a number of tools you’ll need. These include:
There may be other tools you need in addition to these, such as spanners, pliers and grease - so be sure to keep your toolbox fully stocked and close by at all times.
As we’ve already stated, changing your vehicle’s coil springs isn’t the easiest of tasks. Making things harder still is the fact that not all coil springs are the same, making it tricky for us to create a one-size-fits-all guide.
That said, we have provided a guide for those that need a quick refresher before rolling up their sleeves and giving the job a go.
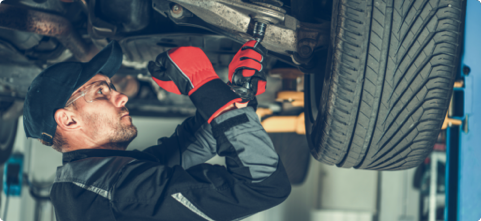
- Using a trolley jack, lift your vehicle to a sensible working height before resting the vehicle on axle stands. Lifting the car higher than you normally would when carrying out a familiar task - such as removing your wheel or altering your brakes - is advisable here, as it’ll allow you greater access to the suspension unit.

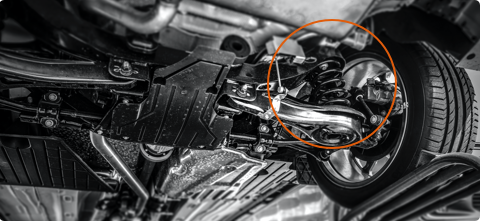
- Next up you’ll need to remove any fittings - such as shocks, for example - that attach to the axle. This is where the socket comes into play. At this point you’ll also need to remove the coil fitting from its top mount.

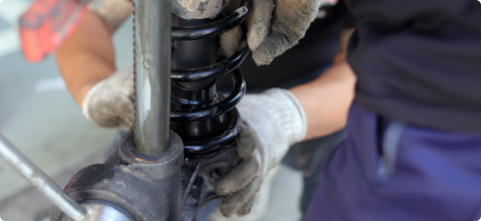
- Once everything’s been removed, attach the coil spring removal tools to both sides of the spring, making sure you’ve left enough room so that you can access the tightening mechanism, as per the image below.

- Using a ratchet or impact wrench, tighten each coil spring in turn. Be mindful not to tighten one too much without adjusting the other. If using an impact wrench this can be done by only applying force for a few seconds at a time.

- Once you’re confident the springs have been compressed enough, try removing the coil from its fitting. This can be done by pulling down on the coil itself.


Important: be sure to wear safety goggles at this stage - the last thing you want is a rogue coil breaking free from the compressor tools and bouncing straight into your unprotected eyes.
- Remove the compressor tool from the old coils ensuring you loosen both for short bursts at a time. Again, you don’t want to loosen one two much without doing the other as this could cause the coil to spring free from the compressor tool without warning.

- Once the compressor tools are free from the old coil, attach them to the new coil spring while it’s on the ground. To make this job a little easier, try adding a drop of oil to the threads of the compressor tool before tightening it up.

- Line up your new coils on the fitting under the wheel arch and begin the process once again of removing the compressor tool. Once you’ve done this, your new coils will be in place.

- Put everything back together, making sure the top mount of the coil fitting and shocks are reattached. You may also want to give everything a quick clean with brake cleaner at this stage too.

And there you have it, job done. Just remember, if you get stuck at any point when fitting your new coil springs, pick up the phone and ask for help. We’d hate it if you were to cause any unnecessary damage - whether it be to yourself or your vehicle.
 APPLIED


 Back to How to Guides